Wednesday, June 25, 2008

Using your PNG Watermark in Photoshop 7

These instructions are similar but not exactly what you would do in Photoshop Elements. Send me email if you need help using Photoshop Elements! Click on images to "zoom" when applicable.

First you need to open Photoshop and open your photo AND your watermark in Photoshop. I have both on the desktop in my example.

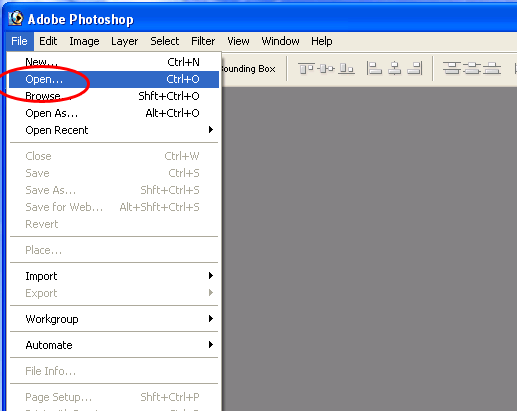
Click on File> Open>

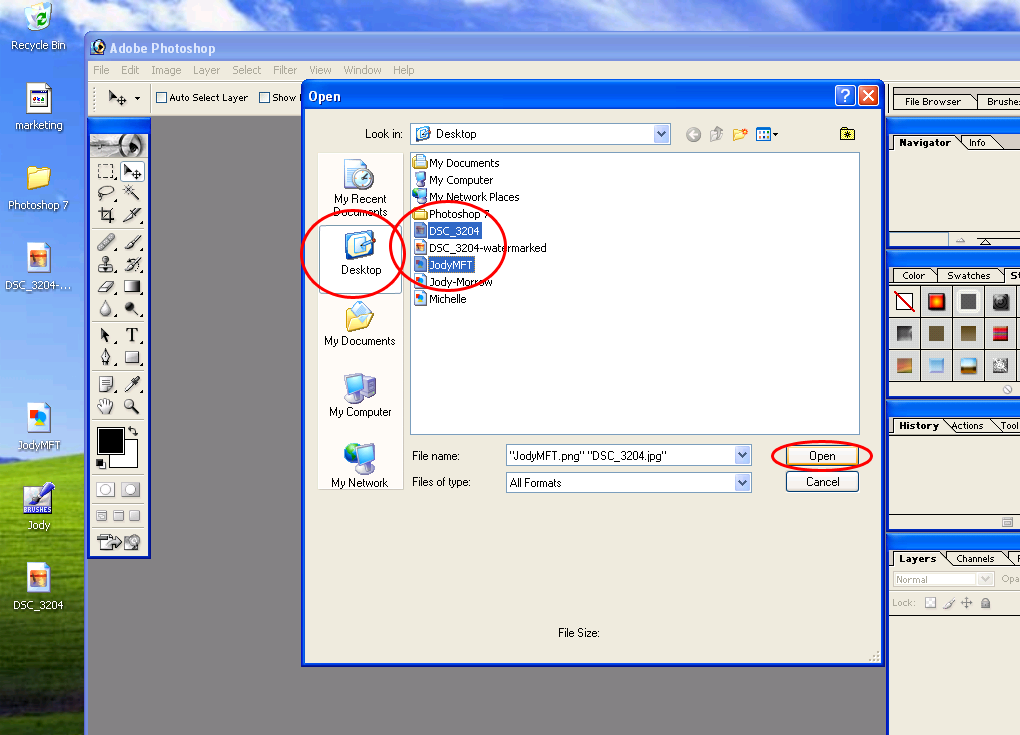
Click Desktop.
then click on both the photo and the watermark files. To select them both at the same time press and hold the Ctrl key on the keyboard wile clicking to select.
Click Open.

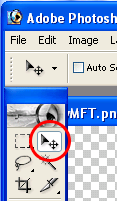
Now that the files are open make sure the Selection tool is selected.
The default location of the toolbar is the right. If it's not showing anywhere click on Window at the top of the program window and click on Tools.

Now you will see both files open in Photoshop...simply drag the watermark from the watermark file onto the photo file:
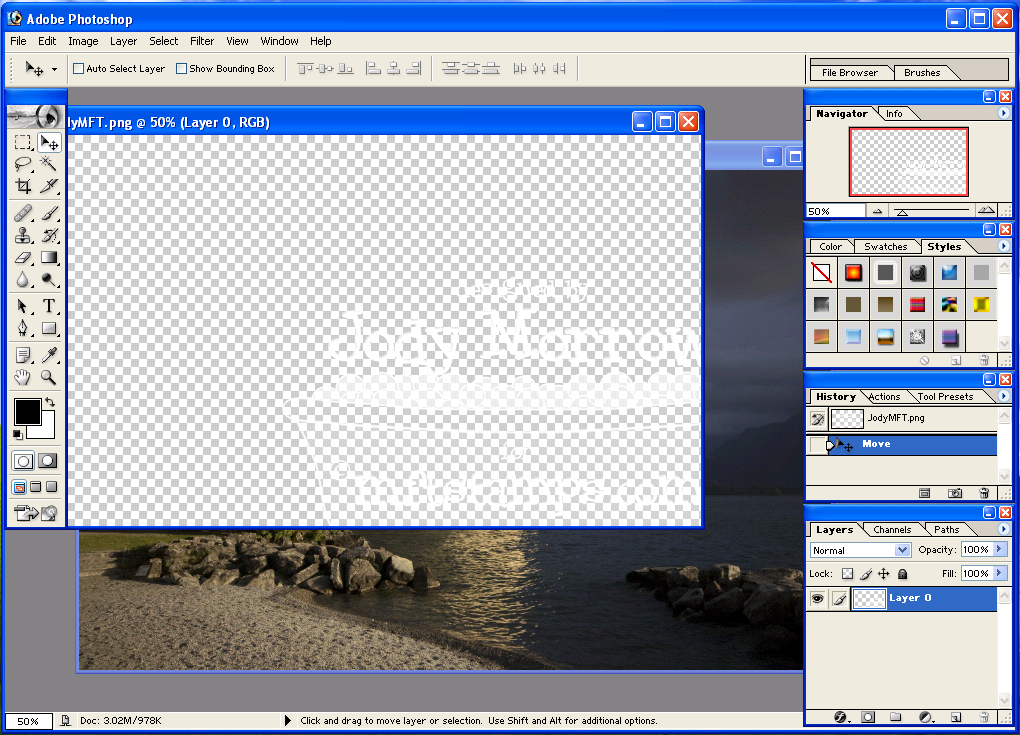
The watermark will move a bit it's ok. Just keep dragging...to drag click on the watermark and keep mouse button pressed whiule moving the mouse. If you don't see both files as shown above click on Window>Documents>Tile.

The watermark is there. Just click on it and drag to position it.
To resize click on Edit>Transform>Scale.
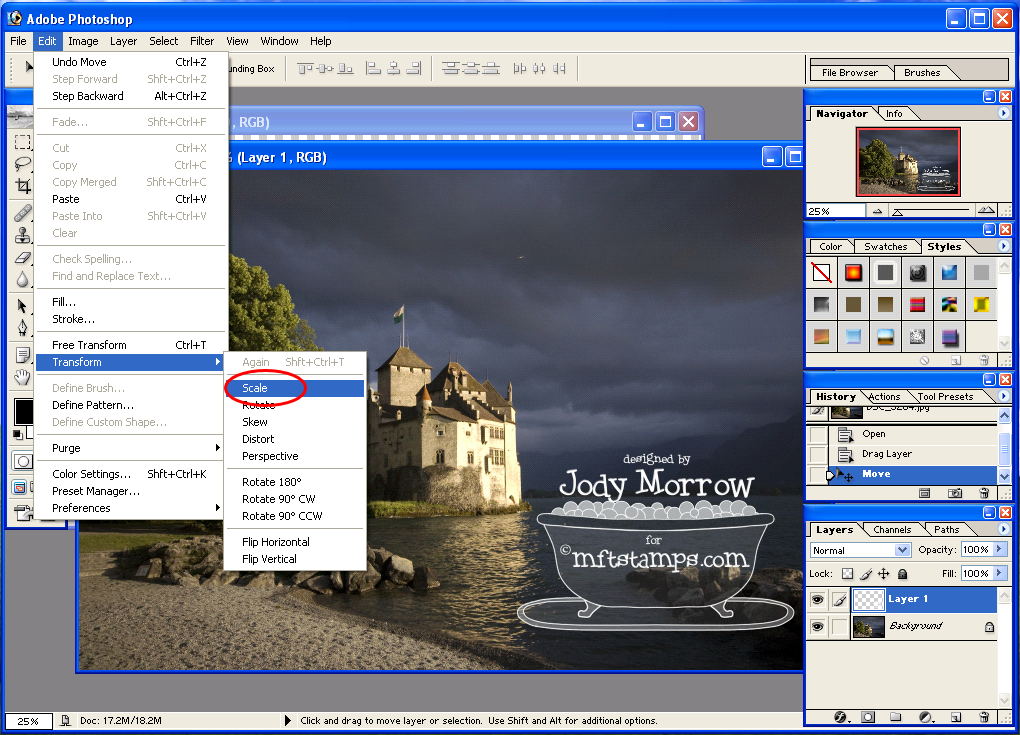

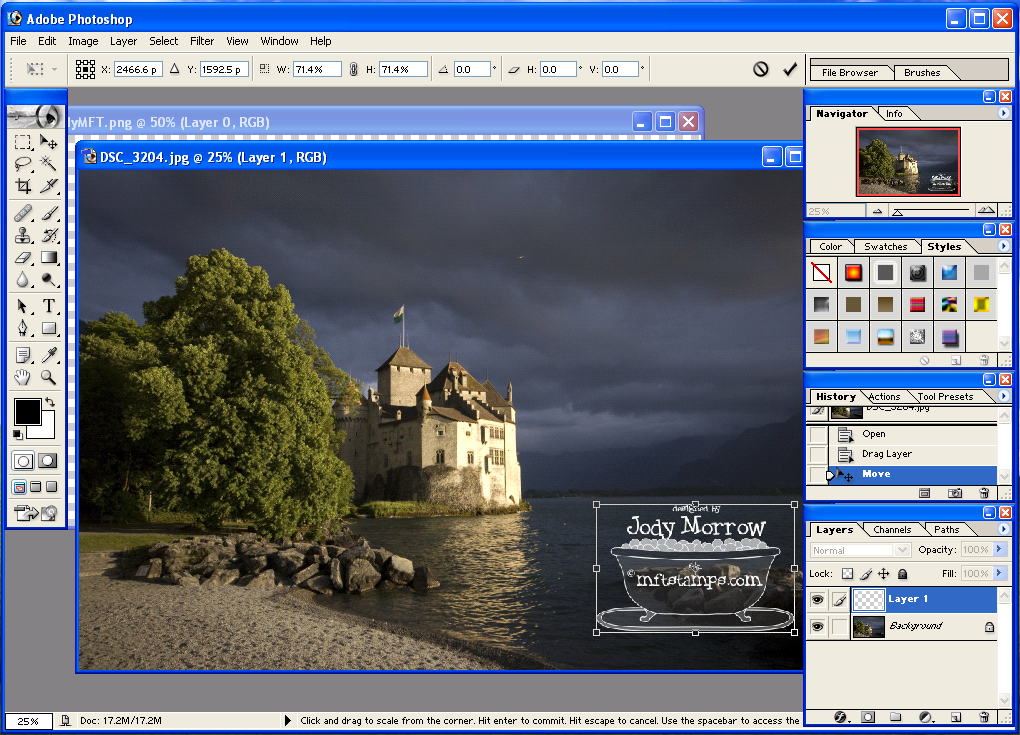
Press and hold the Shift key to constrain proportions while you drag the mouse to resize.
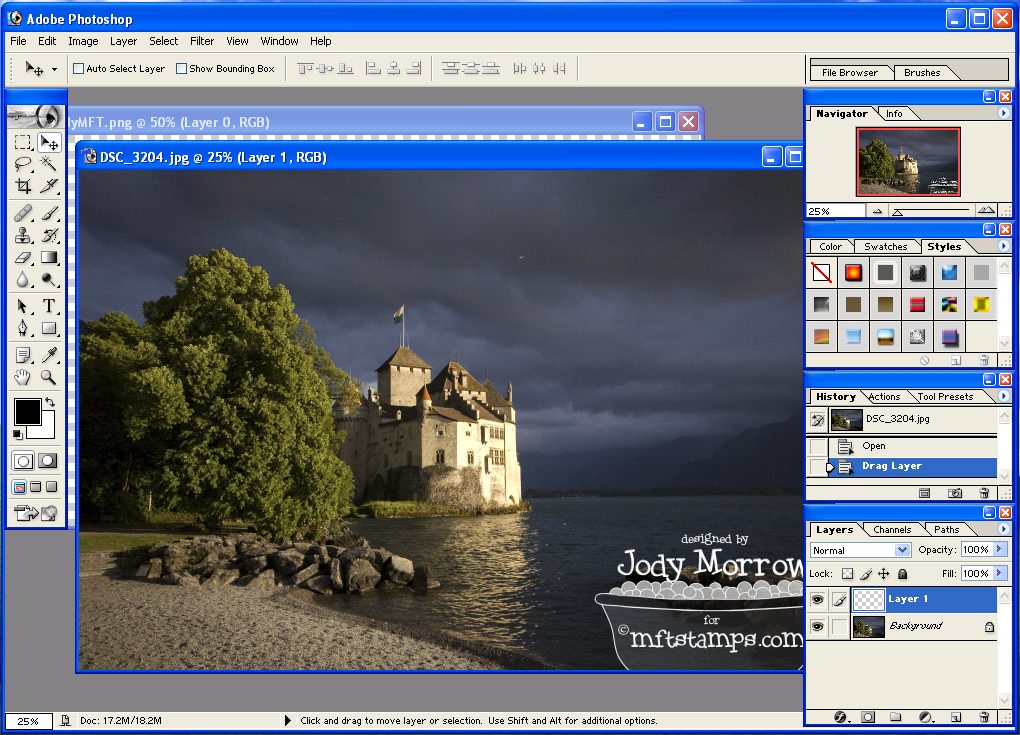

Hit enter on the keyboard when you have it the way you want it.

Now save your watermarked file. In order to keep your image in the original state as well you need to perform as Save As:
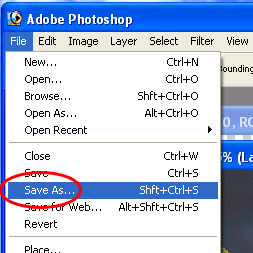

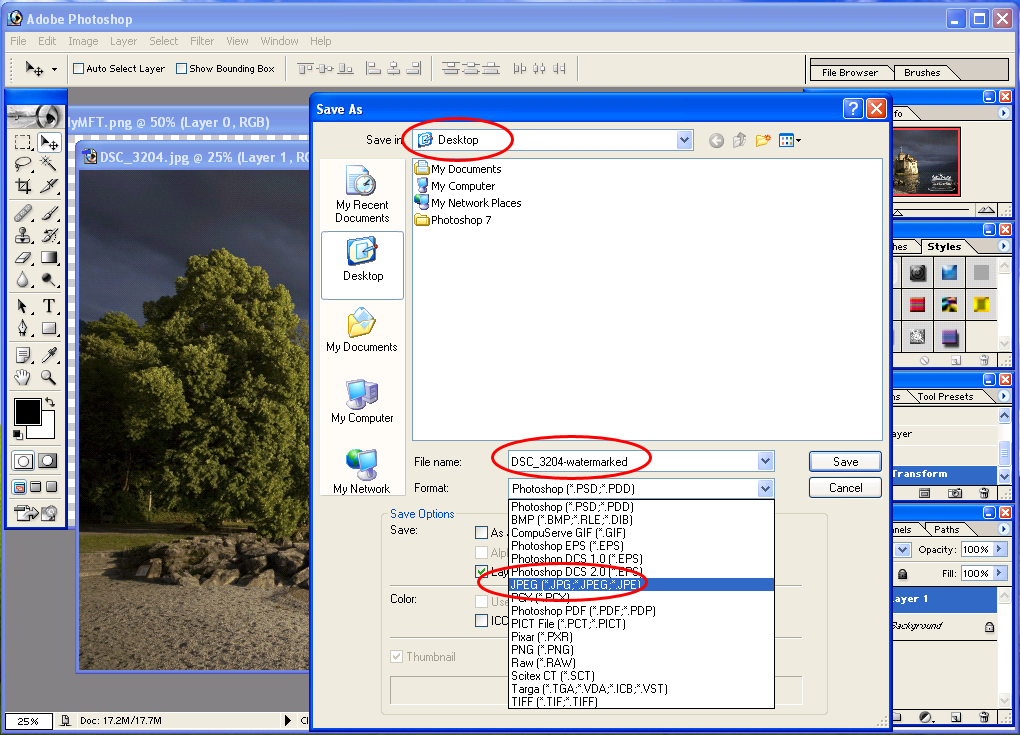
Give it a different name and save as jpeg:

The default settings are fine, click OK.
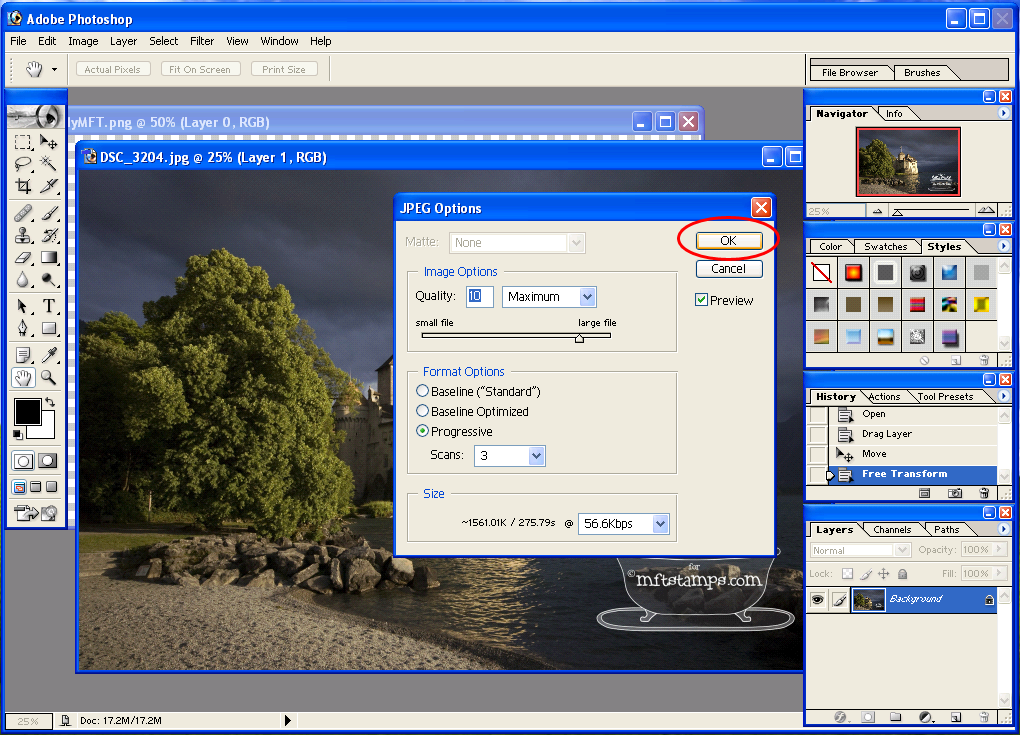

Here is the watermarked picture!


Let me know if my directions are unclear or if you need further help!

Tuesday, June 24, 2008

Adjusting Your Watermark Color with GIMP

There are currently newer versions of GIMP available. These instructions will not be the same for some of these newer versions. If you need more help with a more recent version please email me...be sure to include where you got stumped and the version you are using.

If you need help getting your PNG watermark on your picture first please refer to this article.

So you've got your photo open and your watermark layer in place. There are two ways you can do this. The VERY quick but not as precise or versatile way would be to change the blending mode.

Make sure your watermark layer is selected. Click on the Mode drop down arrow:

Select Subtract:

You can scroll through the modes to see what you like best as well. The results will vary depending on your image.

OR YOU CAN...Colorize

Again make sure your watermark layer is selected. Click on Color as shown below:

The Colorize dialog will appear. You will adjust the lightness lower and the saturation higher...no doubt. The Hue is where the color choices come in. Adjusting the lightness and saturation will differ depending on hue as well. So slide those babies around and play a bit. You'll see what I mean! I wanted to achieve a blue color below:

Click OK and you've got color!

You'll need to save after you've made changes. If you need help with that please refer to this article.

Feel free to email if you have a question!

Saturday, May 24, 2008

Admin Rights for Sara

From YOUR BLOG click on Customize:


Go to Settings Permissions:
 Settings  Permissions

Then click Add Authors:
Add Authors

Next, type sarajwil@hotmail.com to invite me to your blog:
Add User
When you're ready to send the invitation, click Invite.

I'll receive an email with a confirmation link. Once I accept the invitation, I'll send you email. The option to make me a blog admin will appear. Return to the Settings>Permissions tab to view these settings, they will look something like this:


Click the grant admin privileges link next to my name. Please send me email when this is done so that I can get started updating your blog!

Wednesday, May 7, 2008

Changing the Color of your PNG Watermark with Photoshop Elements

These instructions were written using Photoshop Elements 4.0. Some things may or may not be different in other versions.

  • Open the watermark in Photoshop Elements.
  • Push and hold the Ctrl key as you click on the Layer Thumbnail. This will select the image leaving out the background (grey checked rectangular in the bottom right corner):
    • When you mouse over the thumbnail the pointer will become a hand. Then when you press and hold Ctrl the pointer becomes a hand with a box on top. When you see this click on the thumbnail. This will select the watermark's elements leaving out the background.

  • Click on Layer at the top and then select New Fill Layer and then Solid Color:

  • You will see the New Layer dialog box, name it if you wish and then click OK.
  • The color chooser will appear, so get to choosing!
  • When you get the desired color click OK.
  • Click on File and then Save.

You have 2 options here.

  • Just flatten the layers and save the PNG - Change the file name accordingly. Select PNG from the drop down and then click Save, yes you want None...OK.

OR

  • You can save in PSD format. This will allow you to go back and edit the new color layer you made if you want a different color later. - Change the file name accordingly. Then click on Save.

Here's how to modify the color layer later:

  • Open the PSD you saved before.
  • Double click on the thumbnail of the color layer you made previously (here it is the pink square):
  • The color chooser will appear. Choose your color and click OK.
  • Click File, Save As, Name file, choose PNG and click OK...
  • Done!

Tuesday, April 22, 2008

Using Your Watermark in OpenOffice.org Draw

I have included a video to help SHOW you how to do this. But first the step by step instructions.


  • Open OpenOffice Draw.
  • Insert your photo onto the OpenOffice Draw document. I like to use the drag method for insertng images to the document.

--How to drag: As you can see I have the photo I want to watermark (DSC_1391...) and the Waterark file (Cindy.png) sitting on my desktop. All I do is click the mouse button on the file I want to drag, in this case the photo comes first. While keeping the mouse button pressed drag the file onto the OpenOffice Draw document. Release the mouse button to drop it on.

--If you don't like dragging: Click on Insert located at the top of your OpenOffice Draw document and then click on Picture and From File. Locate your photo and double click it.

  • Insert the Watermark file. Again I like to use the drag method. When you drag it make sure you drag it under the photo and NOT on top of it. It seems to get "lost" when doing that. Once it's on the document THEN you can drag it on top of the photo. And if you don't like dragging you can use the Insert>Picture>From File method. You will still need to drag the watermark on top of the photo.
  • Resize the Watermark. When you move the mouse over the watermark you will see the mouse change to a cross hair. When it does Click and hold the mouse button while moving the mouse to resize. To keep proportions press the Shift key while resizing!
  • Now to save your watermarked Photo. You don't want the whole page just the picture so you need to select the watermark and the picture first. The Watermark should still be selected from the resize. If not just click on it. Press the Shift Key while clicking on the photo. This will select the watermark AND the photo.
  • Click on File in the upper left corner of the document.
  • Click on Export.
  • Select the location where you want the file to be saved, I selected Desktop. Then click the Selection option at the bottom of the export dialog. Type in the desire name for your photo and then click on Export.
  • Your freshly watermarked photo should appear on your desktop!

Hosted on Photobucket:


http://s43.photobucket.com/albums/e385/sarajwil/Tweaks%20and%20Designs/?action=view&current=OpenOfficeHelp.flv

Monday, April 21, 2008

Download and Install GIMP

There are currently newer versions of GIMP available. These instructions will not be the same for some of these newer versions. If you need more help with a more recent version please email me...be sure to include where you got stumped and the version you are using.

**If you are a MAC user here is a link to installing GIMP for MAC: http://www.gimp.org/macintosh/**

I’ve provided direct links to the file downloads below. If these do not work for some reason (they should) here is the site where they can be found. http://gimp-win.sourceforge.net/

If you have Windows 2000, 2003, XP or Vista you need this download:
http://sourceforge.net/project/downloading.php?groupname=gimp-win&filename=gimp-2.4.4-i686-setup.exe&use_mirror=internap

If you have Windows 98, ME or NT you will need to download this file:
http://sourceforge.net/project/downloading.php?groupname=gimp-win&filename=gtk%2B-2.6.10-20050823-setup.zip&use_mirror=superb-west

  • Once you click on the appropriate link above you a new window will open for soundforge.net and a message should pop-up. Click on Run. If you get an ad, just skip it. You can also close and try again. Also, if you have everything locked down like I do you will have to install the ActiveX control.

  • The file will download and then a message will appear asking if you’d like to run the software, click on Run.

  • Click Next, Next (yes, yes, you agree) then the all important Install now.

  • When the install is complete a message will pop up, the Launch The Gimp option will be checked. If you’re ready to move on to using your watermark leave it checked and Gimp will open when you click Finish.

  • Click on Finish. Congratulations you are now the proud owner of Gimp for Windows! Be patient the first time the program loads takes a while!

Using Your PNG Watermark in GIMP

    There are currently newer versions of GIMP available. These instructions will not be the same for some of these newer versions. If you need more help with a more recent version please email me...be sure to include where you got stumped and the version you are using.

    **If you are a MAC user and are using GIMP 2.4.4 for the MAC these instructions should work for you as well..please comment with suggestions/corrections if you have any. I don't have a MAC.** :)

    Click on the screenshot animations for a closer look.

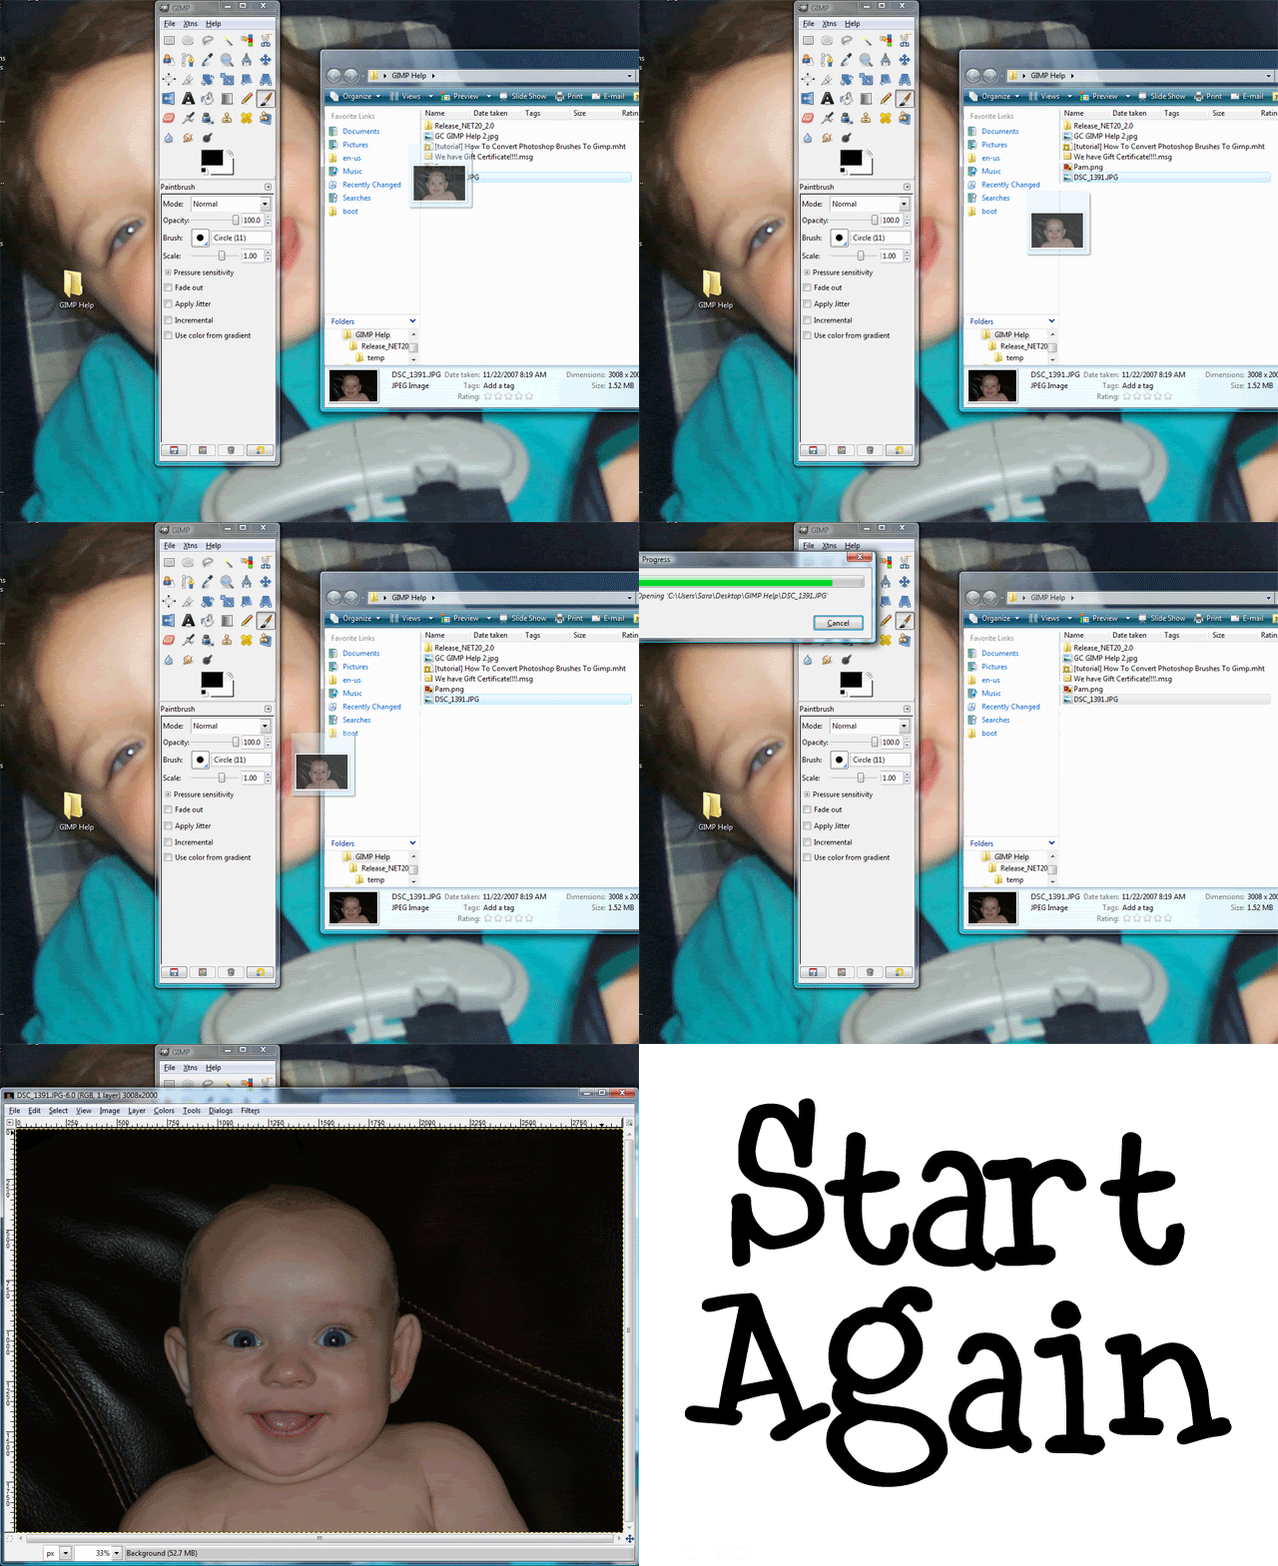
    • First you will need to download and unzip your watermark files. If you need assistance with this please send me email. Be sure to remember where you saved your attachments. For my example my picture AND watermark are both in a folder called GIMP Help I made on my Desktop.
    • Open Gimp (you should have a GIMP shortcut on your desktop). The Gimp Tip of the Day will appear…you can choose to show this each time you open or not right here, then click Close.
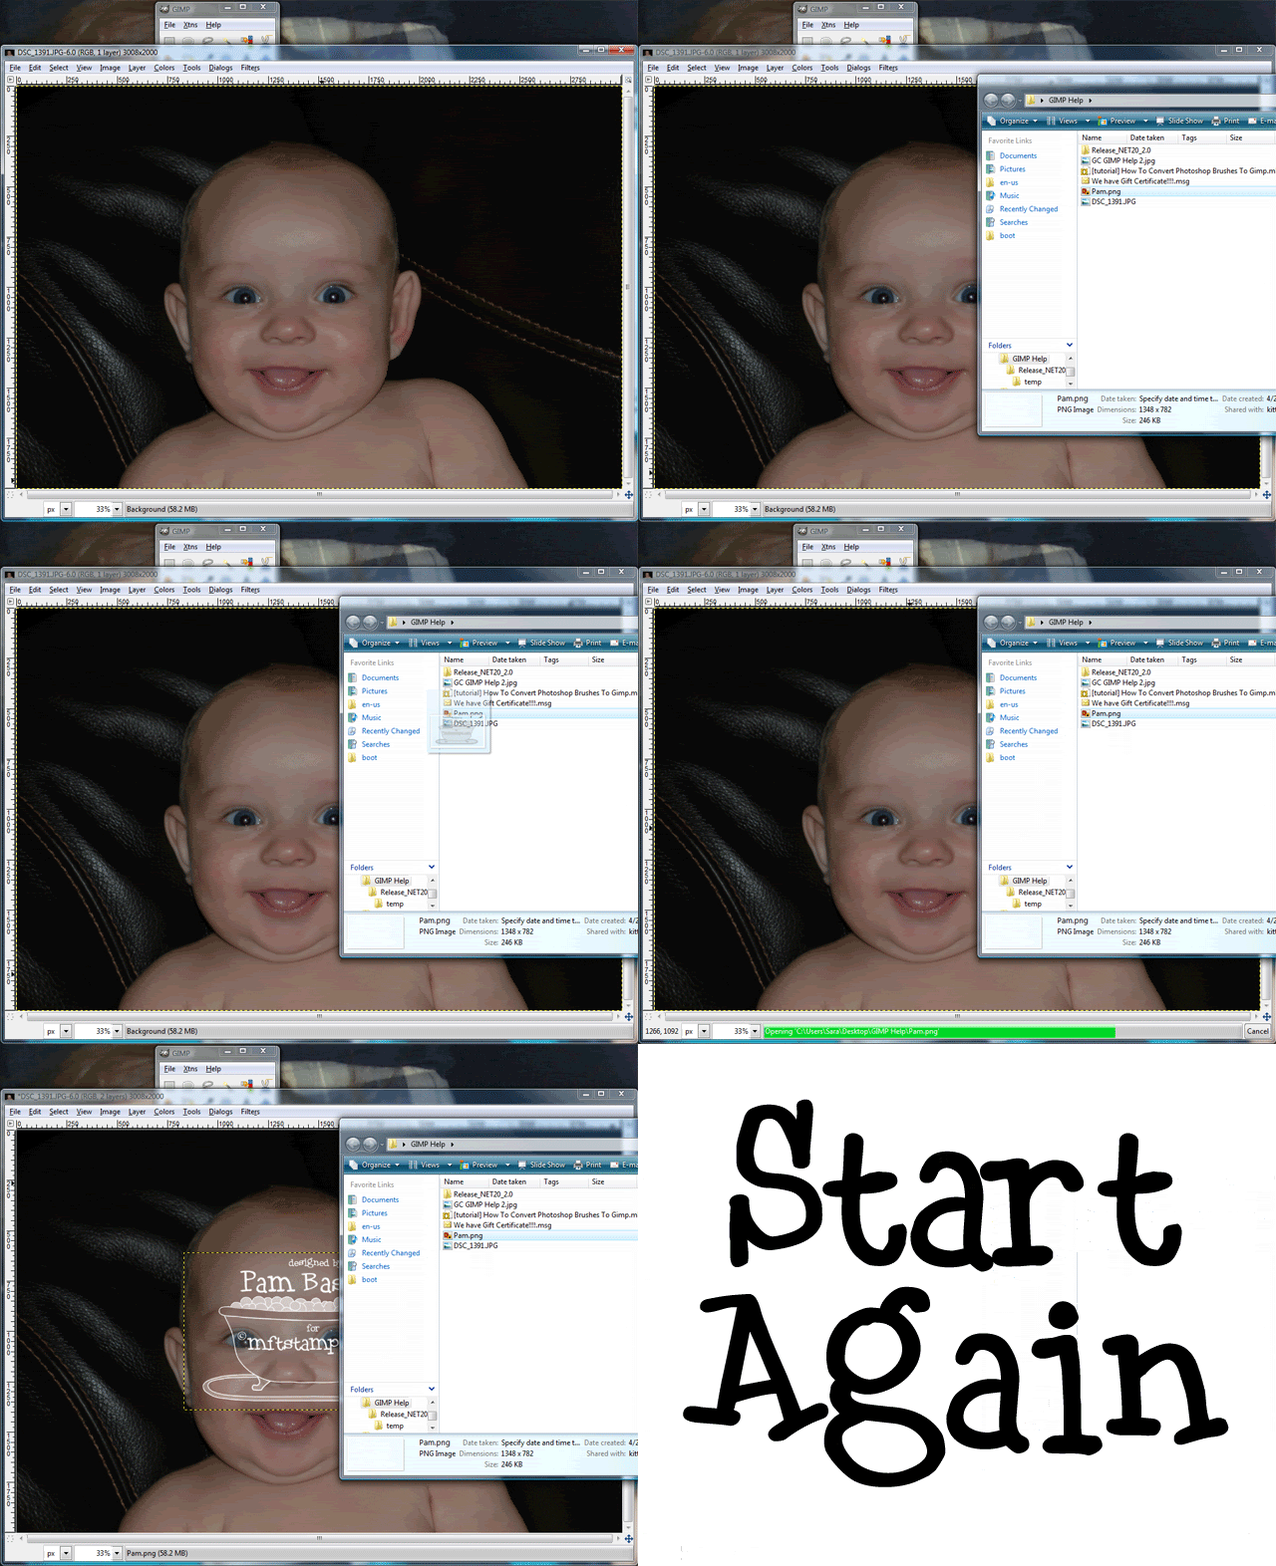
    • Open your photograph in GIMP. You can Click File, then Open, locate your photo, click your picture once to select it and then click Open OR you can just simply drag your picture onto GIMP. To drag click and hold the mouse button on the file while. Move the mouse and you will see the file moving with it, drag your mouse over GIMP and release the mouse button.
    • That being said I do the same thing with the watermark file. Simply drag it onto the picture like so. I had to click the window on the side to bring it to the front.
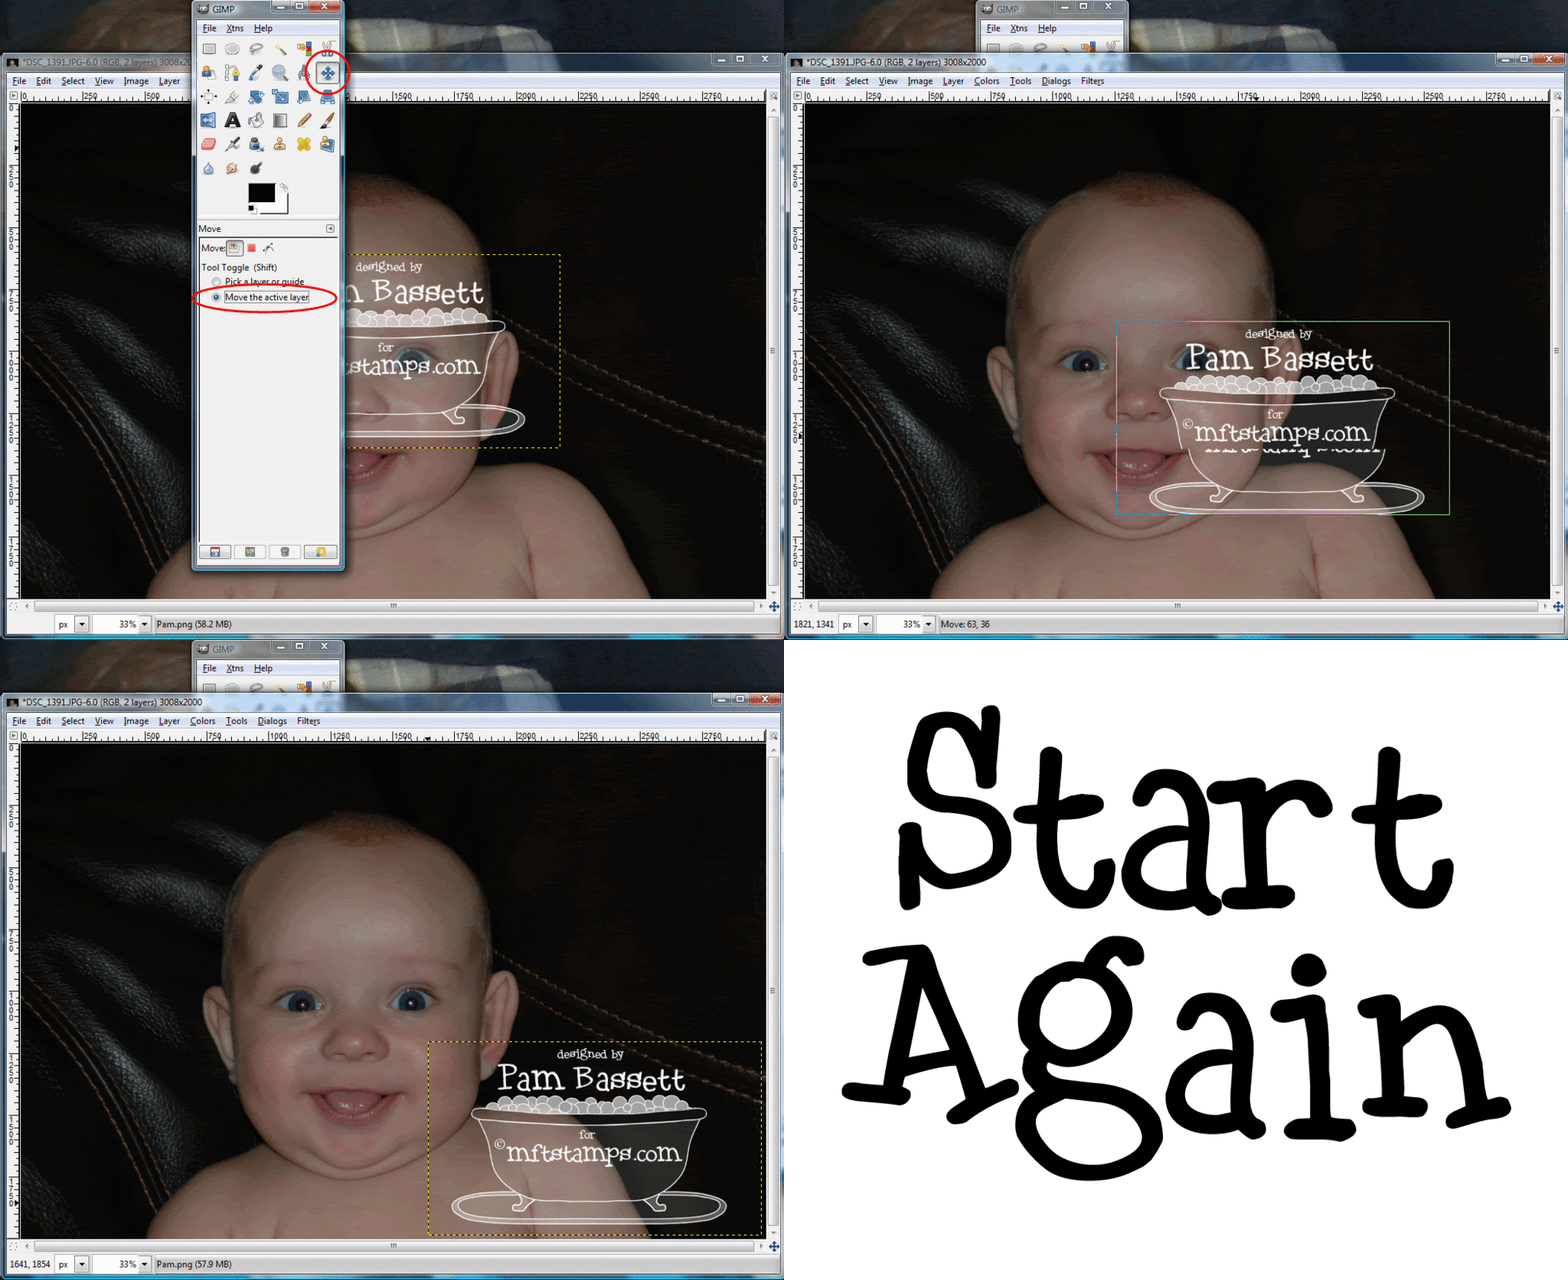
    • Now to place the watermark click on the Move Tool on the GIMP toolbar. You may have to click the top of the toolbar to bring it to the front. Click Move active layer to ensure you move the watermark and not the photograph.
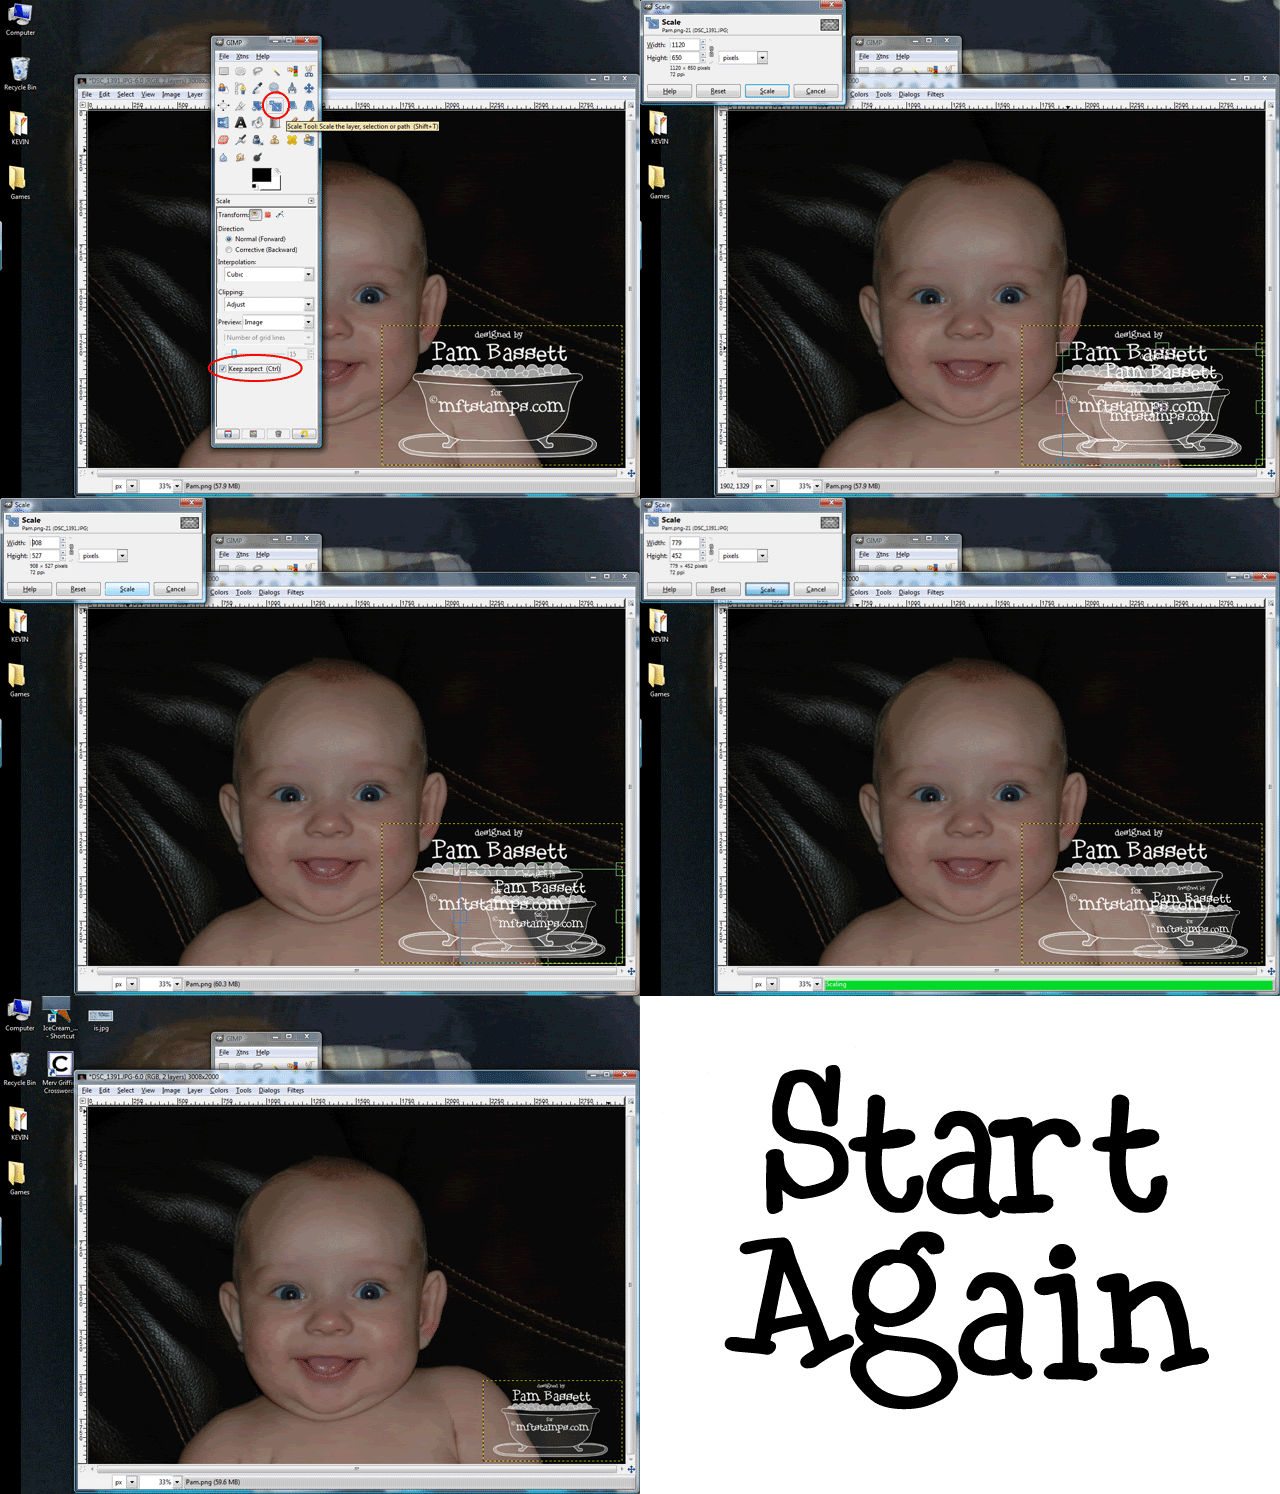
    • To resize the Watermark select the Scale Tool from the GIMP Toolbar. Select Keep aspect so your watermark does not lose its proportions while resizing.
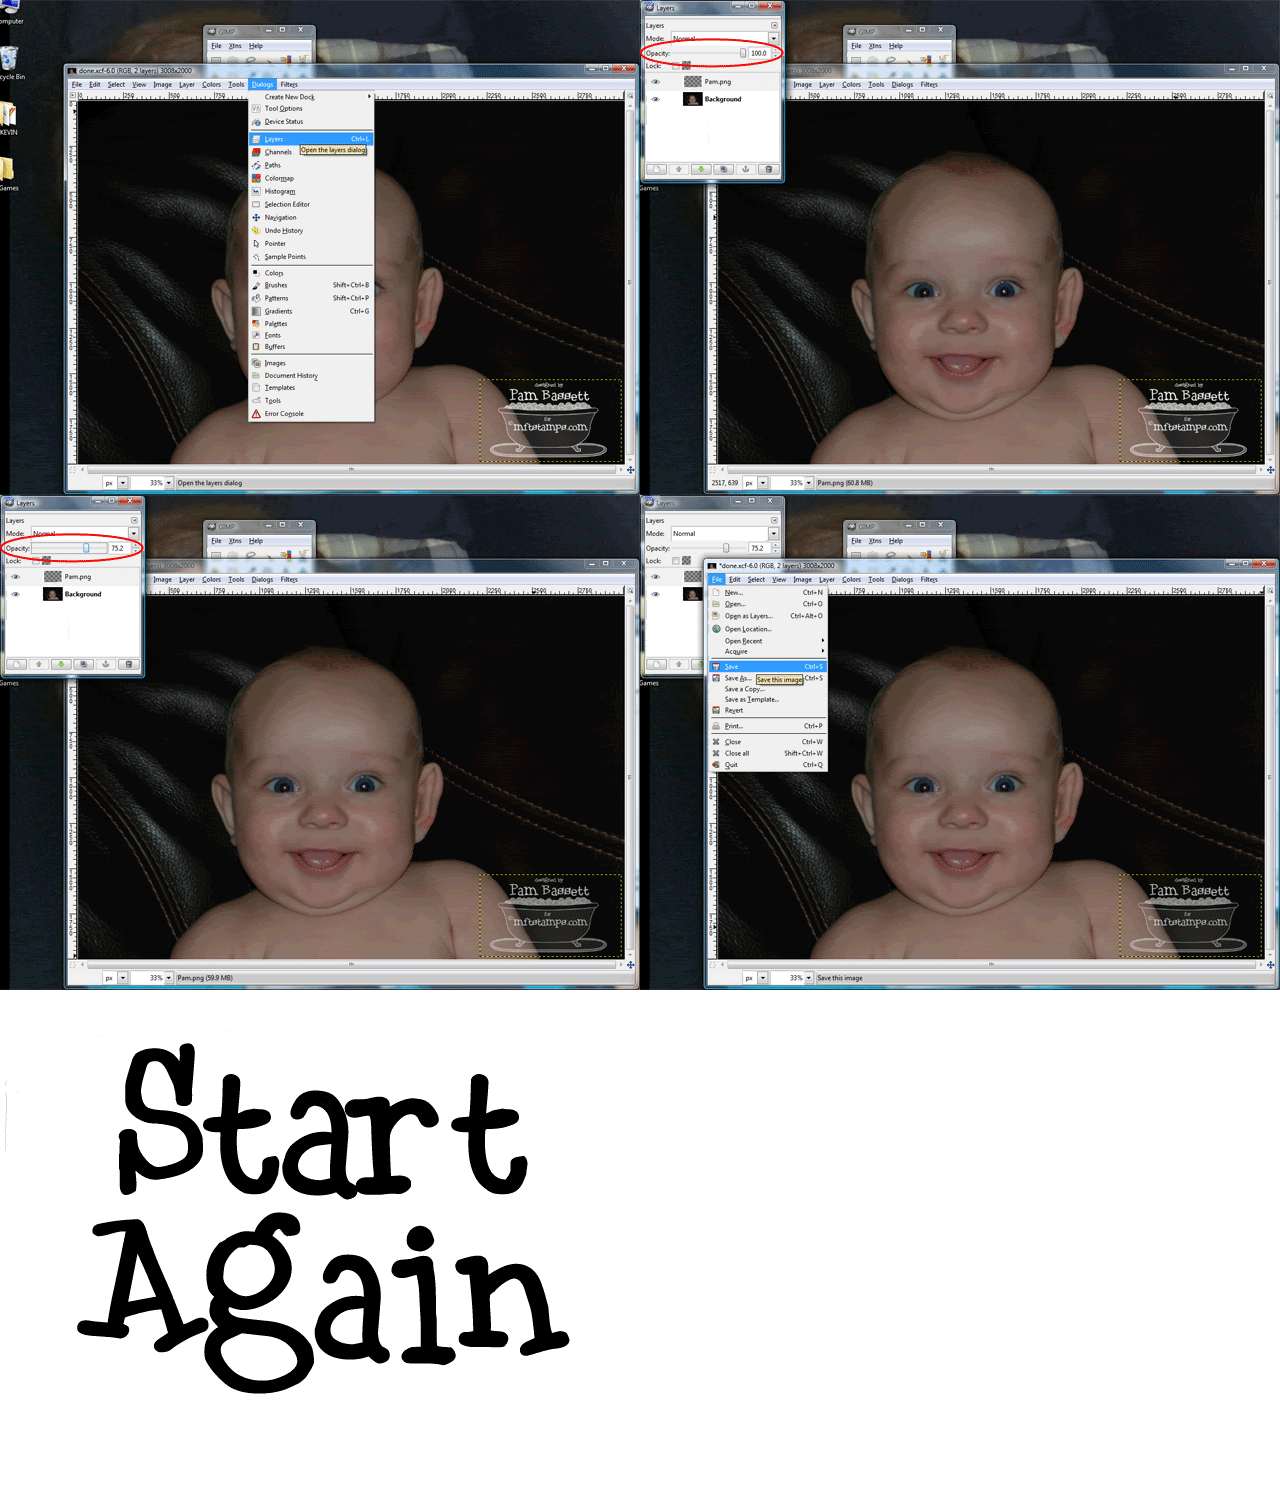
    • The watermark is made white at 100% opacity so that you can completely control it based on your photo. To change the opacity you will need to select the watermark layer and move the Opacity slider.
    • Click File, Save as shown above. If you want to save a COPY click on Save As instead. Be sure to give it a NEW name. You're done!