These instructions were written using iWatermark Version 3.1.3 for Windows.
For these instructions I have the photo I want to watermark and the watermark bundle on my desktop.
Open iWatermark.
You will see Input and Output boxes:
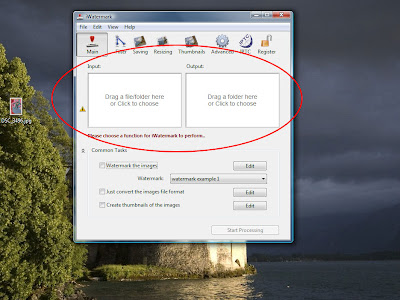
The Input box is the photo you want to watermark. Here you can either drag the the desired image or even a whole folder of images onto the box or you can click on the square to pull up the open dialog and then click to choose your location. The Output box is where you want the file to be saved when your finished.
You will see below I am watermarking one image that I dragged onto the Input box and I chose to Output the completed watermarked photo to the desktop:
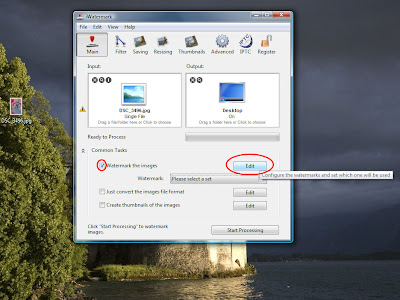
Now to install your custom iWatermark bundle! Click on checkbox next to Watermark the images and click Edit as shown above.
Click on File>Install Watermark Bundle:
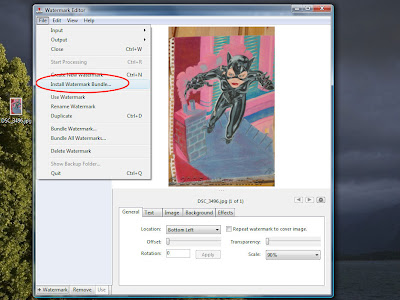
Now the watermark is installed, but wait, I found a minor bug in iWatermark so do this too.
Select the new watermark by clicking the checkbox and selecting the name. It must be highlighted AND checked:
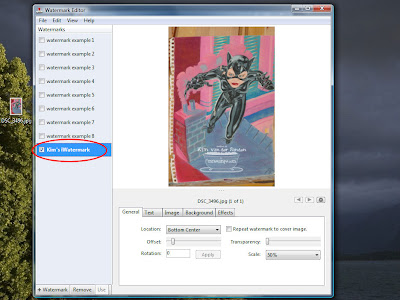
Click File>Duplicate:
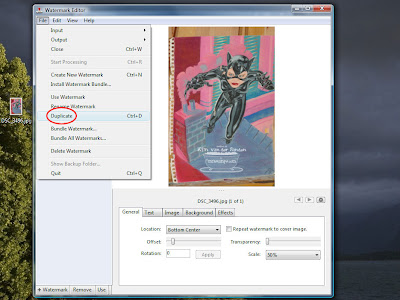
Now you need to select this one instead.
On to the next step! You may need to adjust some of the below circled settings depending on you image. Location, Offset, Transparency and Scale are probably what you will use most often. You will not need to use the other settings on the additional tabs at all. Once you have it where you want it click on the little gear button show below to save your watermarked photo:
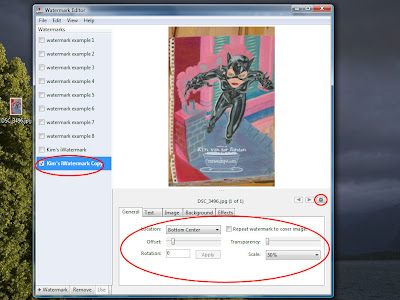
You can also save from the previous screen but I'll talk about that later. Here I am saving the image to the desktop, you can give it any name you'd like.
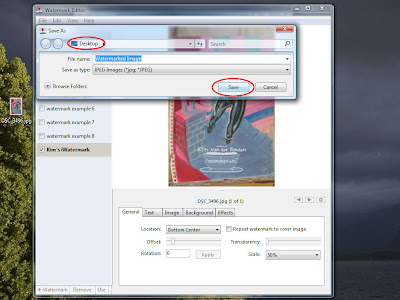
And your finished! Here is the photo watermarked:
Now the next time you open iWatermark all your settings will be saved, simply drag your next photo or folder of photos on the Input box and click on Start Processing at the bottom!
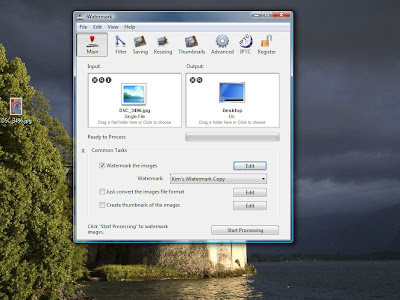
You can also click Edit as we did before if you want to change the watermark placement. If you do you will see that the original installed watermark is gone. Yes that is the bug I found...so that's why we duplicated and worked with that copied dude instead!!!!!
Tuesday, July 22, 2008
Tuesday, July 8, 2008
Using your PNG Watermark in Photoshop Elements
These instructions were written using Photoshop Elements 4. It should be similar to other versions of Photoshop Elements.
- First open your photo and your watermark in Photoshop Elements. I have both on my desktop.
- File>Open:
- Click Desktop (or the location where you can find your watermark and photo).
- Click to select the first file (my image is named Sample.jpg), push and hold the Ctrl key while clicking to select the second file (my image is named WatermarkBelow.png).
Click on Open.
You will see both images. Here the photo is in back and the watermark is on top. If you don't see both click the Cascade button in the upper right corner. - Now simply drag the layer that has the watermark from the watermark file to the photo. To do this click on the layer, keep the mouse button pressed while dragging it onto your photo.
- If you have trouble you can also right click on the layer, click on Duplicate Layer:
- Select the appropriate file (again my photo is named Sample.jpg) and then click OK:
- If you have trouble you can also right click on the layer, click on Duplicate Layer:
- Now you will see the watermark. Make sure you have the watermark layer selected as well as the Move Tool on the left toolbar.
- To resize the watermark you simply move the mouse over the corner, the cursor will change to a double diagonal arrow. Click and hold the mouse button ALSO while holding in the shift key. Move the mouse in and out. You will see the watermark resizing. Pressing the shift key as you do this ensures the proportions stay constrained (doesn't become elongated or squinched).
Once you get the desired size hit enter on the keyboard to commit your changes. - You can also move it by dragging it to where you want it. Again to do press and hold mouse button while moving the mouse.
Now Save it, in order to keep your original UNMARKED photo you will need to click Save As. - File>Save As>
- Choose the location, here I chose Desktop. The name will default to the original file name with the word "copy" after it, change this to whatever you want. Select JPEG under File Type and click Save.
- The default settings are fine so click OK again and you have your new watermarked photo!
Subscribe to:
Posts (Atom)