- Open the watermark in Photoshop Elements.
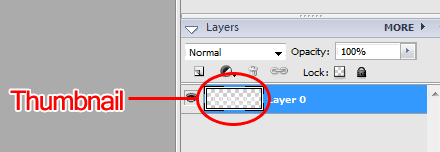
- Push and hold the Ctrl key as you click on the Layer Thumbnail. This will select the image leaving out the background (grey checked rectangular in the bottom right corner):

- When you mouse over the thumbnail the pointer will become a hand. Then when you press and hold Ctrl the pointer becomes a hand with a box on top. When you see this click on the thumbnail. This will select the watermark's elements leaving out the background.
- Click on Layer at the top and then select New Fill Layer and then Solid Color:

- You will see the New Layer dialog box, name it if you wish and then click OK.
- The color chooser will appear, so get to choosing!
- When you get the desired color click OK.
- Click on File and then Save.


You have 2 options here.
- Just flatten the layers and save the PNG - Change the file name accordingly. Select PNG from the drop down and then click Save, yes you want None...OK.
OR
- You can save in PSD format. This will allow you to go back and edit the new color layer you made if you want a different color later. - Change the file name accordingly. Then click on Save.
Here's how to modify the color layer later:
- Open the PSD you saved before.
- Double click on the thumbnail of the color layer you made previously (here it is the pink square):

- The color chooser will appear. Choose your color and click OK.
- Click File, Save As, Name file, choose PNG and click OK...
- Done!

1 comment:
Awesome tutorial. Super clear instructions and able to quickly apply desired result. Thank you!
Post a Comment