Saturday, May 24, 2008

Admin Rights for Sara

From YOUR BLOG click on Customize:


Go to Settings Permissions:
 Settings  Permissions

Then click Add Authors:
Add Authors

Next, type sarajwil@hotmail.com to invite me to your blog:
Add User
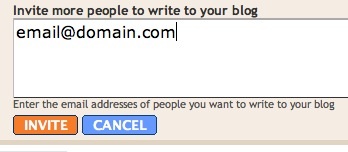
When you're ready to send the invitation, click Invite.

I'll receive an email with a confirmation link. Once I accept the invitation, I'll send you email. The option to make me a blog admin will appear. Return to the Settings>Permissions tab to view these settings, they will look something like this:


Click the grant admin privileges link next to my name. Please send me email when this is done so that I can get started updating your blog!

Wednesday, May 7, 2008

Changing the Color of your PNG Watermark with Photoshop Elements

These instructions were written using Photoshop Elements 4.0. Some things may or may not be different in other versions.

  • Open the watermark in Photoshop Elements.
  • Push and hold the Ctrl key as you click on the Layer Thumbnail. This will select the image leaving out the background (grey checked rectangular in the bottom right corner):
    • When you mouse over the thumbnail the pointer will become a hand. Then when you press and hold Ctrl the pointer becomes a hand with a box on top. When you see this click on the thumbnail. This will select the watermark's elements leaving out the background.

  • Click on Layer at the top and then select New Fill Layer and then Solid Color:

  • You will see the New Layer dialog box, name it if you wish and then click OK.
  • The color chooser will appear, so get to choosing!
  • When you get the desired color click OK.
  • Click on File and then Save.

You have 2 options here.

  • Just flatten the layers and save the PNG - Change the file name accordingly. Select PNG from the drop down and then click Save, yes you want None...OK.

OR

  • You can save in PSD format. This will allow you to go back and edit the new color layer you made if you want a different color later. - Change the file name accordingly. Then click on Save.

Here's how to modify the color layer later:

  • Open the PSD you saved before.
  • Double click on the thumbnail of the color layer you made previously (here it is the pink square):
  • The color chooser will appear. Choose your color and click OK.
  • Click File, Save As, Name file, choose PNG and click OK...
  • Done!